
Model: LG N4B1 Network Attached Storage with Built-in Blu-ray ReWriter
Manufacturer: LG Electronics
Provided By: LG Electronics USA
LG Electronics is one of Korea's oldest and most respected consumer electronics firms. Since the introduction of their first radio in 1959, the company has grown to become one of the world's top electronics manufacturers, offering everything from large home appliances to tiny mobile phones. LG is no stranger to the storage industry either. Working closely with companies like Hitachi, they've lead the way in this area, developing and manufacturing a wide range of optical storage products, including the industry's first "Super-Multi" drives.
 At this year's Consumer Electronics Show (CES), LG previewed its first networked attached storage device, the N4B1. Designed for home and small business users, this four-bay NAS supports multiple RAID configurations and can store up to 8TB of data. The N4B1 also features built in FTP, print and iTunes music servers as well as the ability to automatically download data from memory cards and USB storage devices. Using its version management system, the NAS automatically tracks what data has been downloaded, saving time and space by not duplicating files.
What makes the N4B1 stand out among other NAS devices in its class is its built in Blu-ray rewriter. This drive serves as a secondary storage medium, allowing you to archive up to 50GB worth of data on a single disc. The N4B1's Blu-ray rewriter also makes it possible to share a BD, DVD or CD among many users by creating a virtual disc library. The NAS creates and stores an image of a disc, which is then accessible to all users on a network. According to LG, this not only saves time, but reduces wear and tear on discs.
| LG N4B1 Network Attached Storage with Built-in Blu-ray ReWriter | |||||||||||||||||||||||||||||||||||||||||||||||||||||||||||
|
General Specifications
Blu-Ray Re-Writer
LAN Interface
USB Interface
e-SATA Interface
Other Interface
Network File Services
Misc Features
|
Needless to say, this is only a taste of what LG's Blu-ray equipped NAS has to offer. To give you an idea of what to expect, we'll take an in-depth look at the N4B1's features and then put it through its paces to see how it performs. Does LG's new NAS have what it takes? Is support for Blu-ray enough to put it on top? Keep reading as we find out.
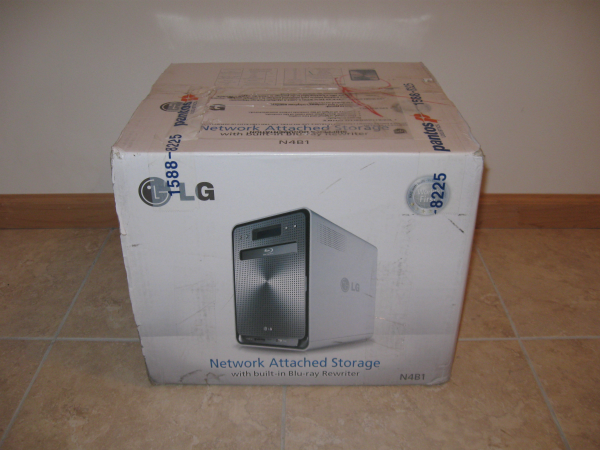
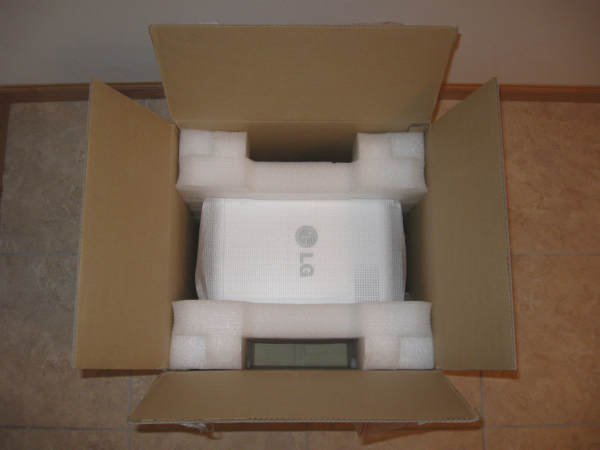
The N4B1 comes in a fairly large box which displays the NAS from various angles and lists its many features. The system is also well protected from bumps and drops thanks to a few inches of protective foam padding on each corner.
 |
 |
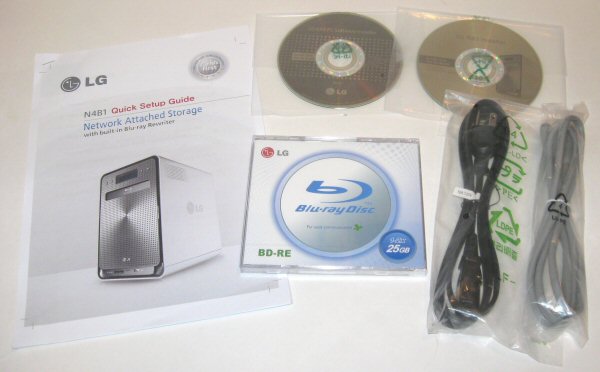
Sitting on top of the N4B1 is a small box which contains the accessories. Along with a quick start guide, you get an AC power cord, ethernet cable, LG NAS PC Software CD, LG NAS Installer CD and a blank 25GB BD-RE disc.
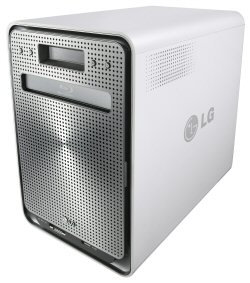
The N4B1 measures 190 × 289.4 × 270.5 mm (7.48 x 11.39 x 10.65 in) and weighs in at 7 Kg (15.43 lbs) without any hard drives. While this is a bit large for a four bay NAS, the built in Blu-ray ReWriter accounts for much of this extra space. Above the Blu-ray drive, you can see an LCD panel and a series of buttons (Power, Disc Open, Mode and Set). The panel shows the current state of the N4B1 and can be used with the buttons to setup the system and control a number of its functions.

Along the bottom, there is a built in memory card reader and a USB port where you can plug in a digital camera, flash drive or external hard drive.
The four hard drive bays are located behind the N4B1's front cover. Before you can remove a drive, you need to unlock the disk rack by pulling out the red locker lever. Once this is done, the drive can be removed from the NAS. The whole rack system is surprisingly smooth and it takes very little effort to insert and remove the drives.
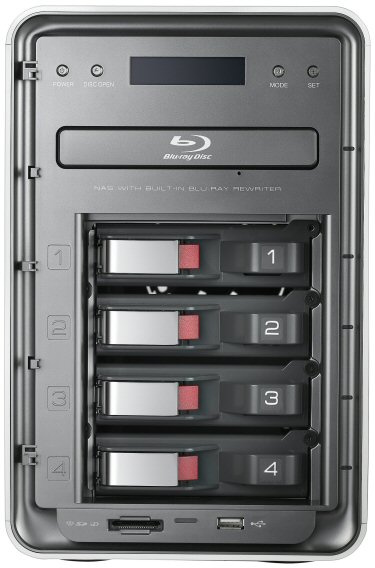
To the right of the hard drive bays, there is a series of LED's. These LED's show the current state of the drives. If one or more of them light up red, there is a problem. Otherwise, they will light up blue if everything is operating normally.
 |
 |
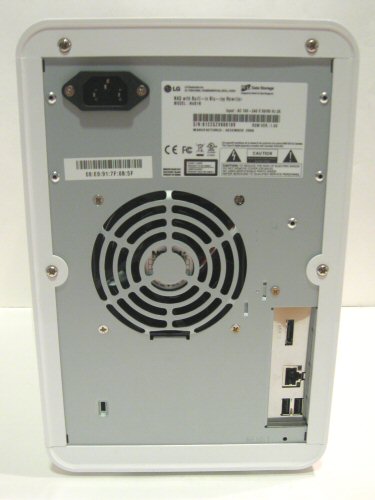
The rear of the N4B1 is pretty straight forward. Along with the AC power connection, there is a 92mm fan. This fan is temperature controlled and only spins as fast as needed to keep the system cool. Also located along the right hand side, there is an ethernet port, eSATA port and two more USB ports. Right below these is a reset switch that will forcefully shutdown the system.
The N4B1 LG sent us for this review was ready to go out of the box. However, those that buy one in stores will need to install their own hard drives as well as the system software before the unit can be powered on.
Those handy with a screwdriver won't have any problems installing the hard drives. Simply insert one or more into the hard disk racks and screw them into place. When this is done, slide the racks back into their corresponding slot on the unit.
The next step is to install the system software. To start this process, hold down the ‘SET’ button and press the ‘POWER’ button.

The N4B1 will power on and after approximately 20 seconds the message shown below will appear and the tray will automatically open. Insert the “LG NAS Installer” disc into the Blu-ray drive and push the “DISC OPEN” button to close the tray. The messages “Checking Disc Contents…” and ”Boot from ODD, wait please…” will appear to indicate that the NAS is preparing to organize system files.

After a minute or so, the N4B1 will ask if you'd like to do a default or custom setup. The default option will automatically configure the RAID level, depending on the number of hard drives in the device. Otherwise the custom option will leave things as is so that you can configure the RAID level and volumes through the web interface when the setup process is complete.

It takes about 10 minutes to copy all of the system files over to the N4B1. When all of the system files have been installed, the NAS will automatically reboot. After another 40 seconds or so, a sound will indicate the completion of system set up.

If you chose to do a default setup, the N4B1 will automatically begin the configuration of the volume and RAID. Depending on the number and size of the hard drives, it can take anywhere from 15 to 60 minutes to perform a format and then another 4 to 18 hours to complete the RAID configuration.
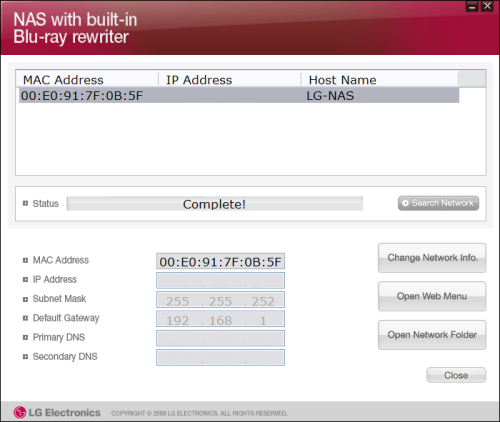
Once the N4B1 is up and running, its network connection will need to be configured. If you have a DHCP server on your network and you know what IP the NAS is using, you can skip the next few steps and connect directly to the web menu. Otherwise, you'll need to pop the “LG NAS PC S/W Installer” CD into your computer and install the NAS Detector software.

The NAS Detector software searches the network looking for LG NAS devices. When it finds one, it will display its IP address, MAC address and host name. Using the NAS Detector software, you can also change the network information, open the web menu or access the network folder.
If you don't have a DHCP server on your network or a Windows PC capable of running the NAS Detector software, you can use the LCD panel and front buttons to configure the N4B1's network connection. From here you can choose whether or not to use DHCP and, if need be, manually enter the IP and network information.
With the network interface configured, you access the web menu by entering the N4B1's IP address into your web browser's address bar. Initially, you will need to login using the default administrator account. The user ID is ‘admin’ and the initial password is ‘admin’.

The web menu lets you view information about the system and change its settings. It also offers share and service management as well as menus to backup data to and from Blu-ray Discs and mobile devices.
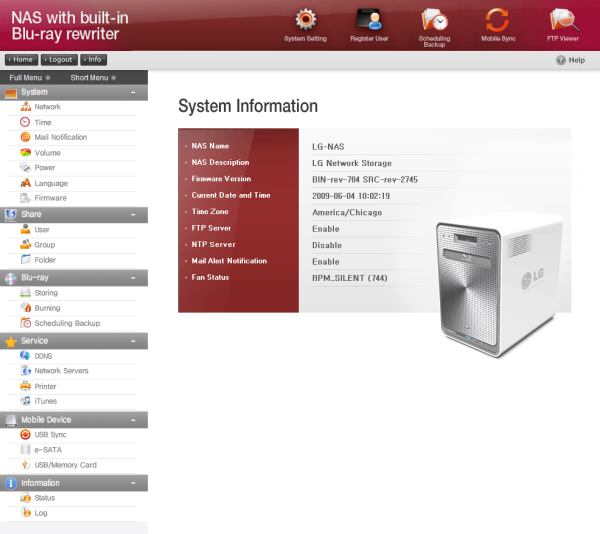
First, we'll take a look at the System Settings. This menu lets you configure things like the N4B1's network connection, RAID volume and power settings. You can also setup mail notifications and update the firmware of the system and Blu-ray drive.
Network:
The network settings are pretty straight forward. From here, you can designate a custom host name and description as well as change the IP address properties. The N4B1 can also be integrated into an Active Directory environment, allowing you to import existing user information.
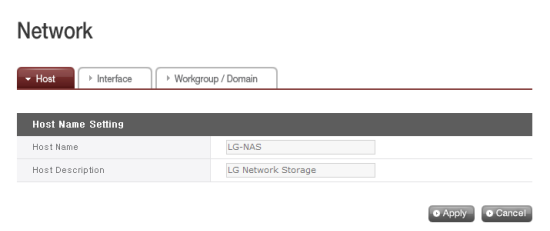
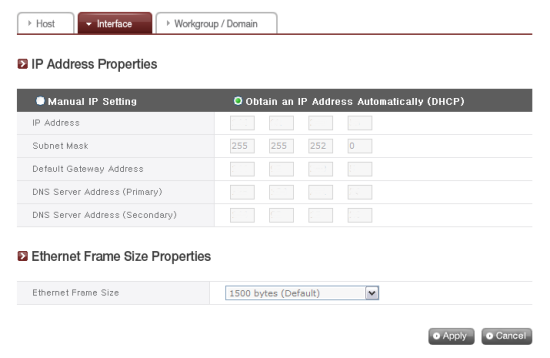
The network interface menu also lets you set the Ethernet frame size. Along with the default 1500 bytes, you can choose jumbo frames ranging in size from to 9000 bytes.
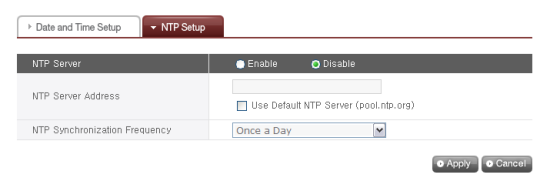
Time:
The first time you set up the N4B1, you will need to set the time, date and local time zone. You can also specify an NTP server so that the time is automatically synchronized at set intervals.

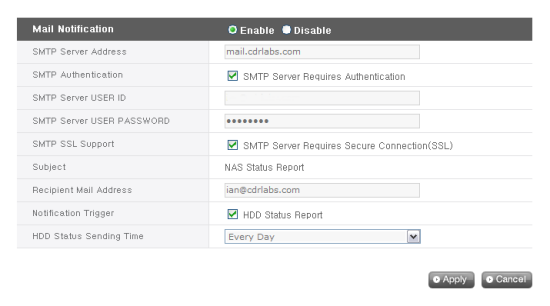
Mail Notification:
If you don't want to login to the web menu to check the status of the N4B1, you can have it send you a periodic status report. To set this up, enter the SMTP server address, SMTP authentication information and the recipient's email address.

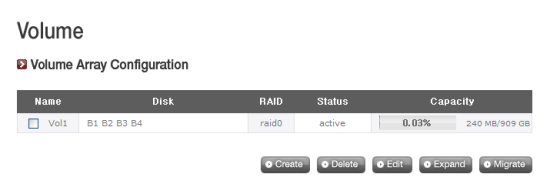
Volume:
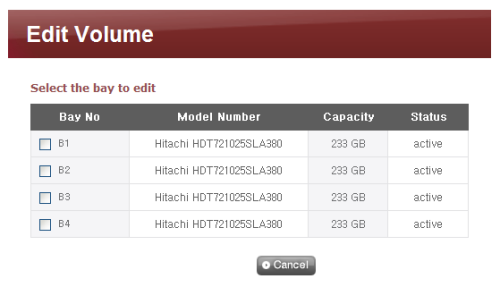
The Volume menu lets you view the status, RAID level and capacity of the storage volumes on the N4B1. You can also create new volumes as well as delete, edit, expand and migrate existing ones.
Power:
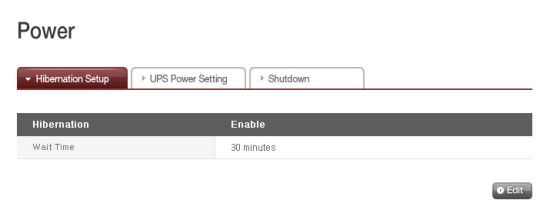
When the volumes on the N4B1 have not been accessed for a given amount of time, the hard disks will enter standby mode to minimize power consumption. This hibernation mode can be adjusted or disabled altogether through the Power menu.
The N4B1 can also communicate directly with an APC style USB UPS and power itself down in the event of a power failure.

Last but not least, the N4B1 can be restarted and shutdown remotely through the Power menu.

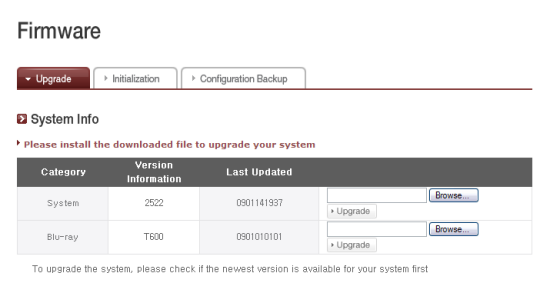
Firmware:
Firmware for the N4B1 and its Blu-ray drive can be downloaded from LG's website and updated through the web menu. Before doing so, it is highly recommended that you backup your current configuration.

If the firmware upgrade goes wrong or you want to start totally over, the N4B1 can be restored back to its factory settings. Take note that this will delete all of the data stored on the volumes.

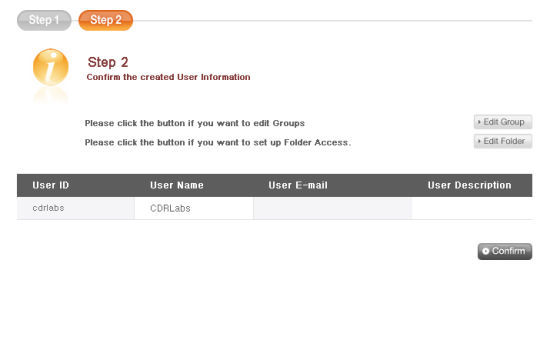
Once you have the N4B1 configured, you'll need to setup the shares and create some users and groups. To create a user, you can use either the Register User wizard or the User option under the Share Settings menu. Both work equally well. However, the wizard will let you link the user account you just created to existing groups and folders.

 |
 |
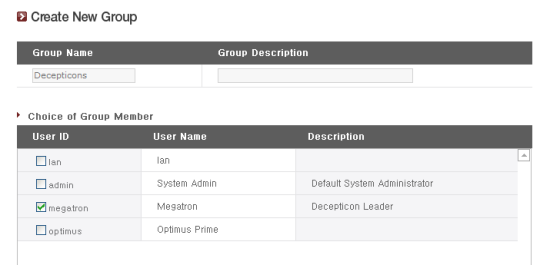
The Group option is pretty straightforward. From here, you can create and delete groups as well as add and remove users.
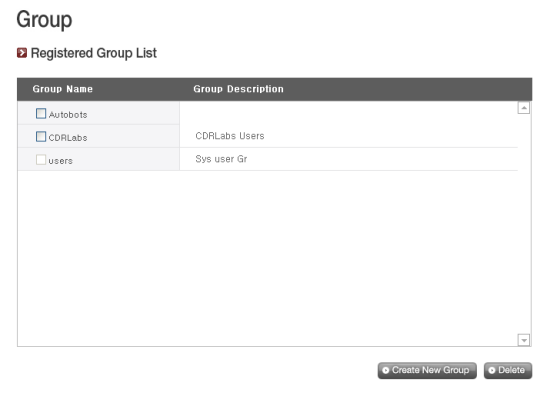
My only real complaint with the N4B1's user and group management tools is that you cannot give administrator rights to users. If you want to change any settings or create additional new user accounts, you need to login with the default admin account.
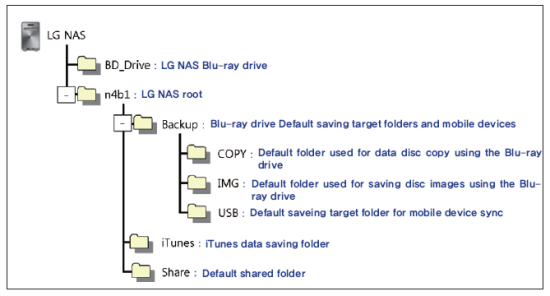
By default, the N4B1 has a number of shared folders for things like its Blu-ray drive, iTunes streaming server and data backups. You can also create your own using the Share option in the Share Settings menu.
Clicking on the Share option will bring up the screen shown below. From here, you can create and delete folders as well as change their attributes and authorization settings.

To create a new folder, you will need to specify a name, select the volume where it will be created and select the protocols (SMB, AFP and FTP) it supports. You can also choose to hide the folder from the network search and create a recycle bin for deleted files.
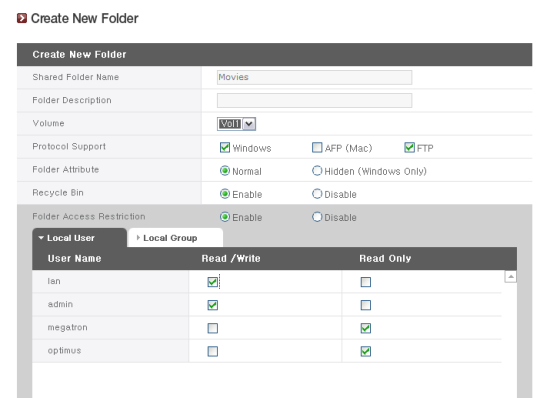
The last thing you need to do is specify which users and groups can read and and write to the folder. These restrictions can also be disabled, giving full access to all users.
I should point out that the N4B1's sharing capabilities are limited to the local RAID volumes. External hard drives attached its USB and eSATA ports cannot be shared, which is a bit disappointing as it limits the expandability of the system.
The N4B1 offers support for a number of services, including Dynamic DNS, FTP and AFP servers, network printing and iTunes music streaming.
Dynamic DNS:
Using Dynamic DNS (DDNS), you can connect to the LG N4B1 by its domain name in environments where the IP may change over time. The service monitors the IP address and maps it to a domain name in real time.

Instead of using a well known service like DynDNS.com, LG has implemented their own. To use this service, enable it through the web menu and provide a domain name and password.
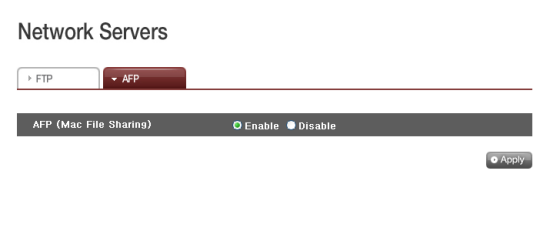
FTP and AFP:
Like most NAS devices, the N4B1 features a built in FTP server. Using the File Transfer Protocol (FTP), you can download or upload files from a remote location. To use the FTP service, enable it through the web menu and specify the port it should listen on. If you haven't already, you will also need to go in and give users permission to access folders via FTP.

The N4B1 also features support for the Apple Filing Protocol (AFP). Unless you have older Macs running Mac OS 9 or earlier, you're better off using Windows File Sharing (SMB/CIFS).
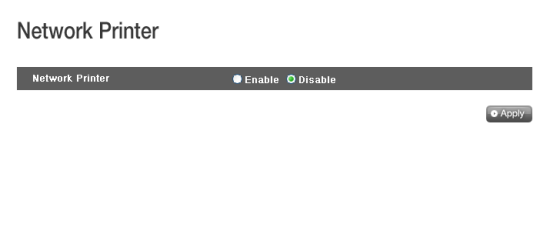
Network Printer:
The N4B1 can also function as a network print server that can be used by both Macs and PCs on the network. To do this, you will need to plug a printer into one of the USB ports and enable the service through the web menu.

iTunes Music Server:
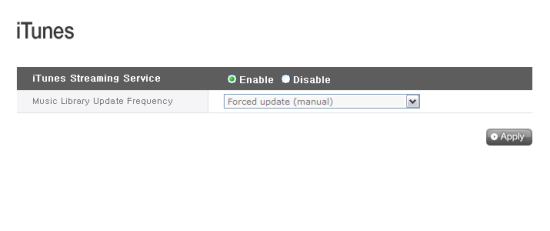
Before new tracks are recognized, the library will need to be updated. The N4B1 can perform this task automatically or you can do it manually through the web menu. Once updated, they will show up in your iTunes software.

Unfortunately, the N4B1 does not have the ability to stream photos or videos. This was a bit disappointing, as many NAS devices now come with a built-in uPnP/DLNA media server. Hopefully, this is a feature that LG can add in a future firmware update.
As I mentioned earlier, the N4B1 can be used to backup USB devices and memory cards. If you'd like to make a quick backup, you can use the buttons on the front of the device. To begin, connect the USB device or memory card to the NAS. After a short while a sound will be heard indicating that a connection has been made.

Next, press the MODE button until the USB backup mode appears on the LCD. Pressing the SET button will begin the backup process. All files will be copied over to the NAS and saved in a folder within the default USB backup location (n4b1/Backup/USB).
You can also "sync" your USB devices with the N4B1 using the Mobile Sync wizard or the USB Sync option under the Mobile Devices menu. Both work equally well when creating new settings. If your USB device or memory card is already connected to the NAS, it will show up in the list of devices. Choose the one you want to sync and click on the "Setting" button.


For the second step, you will need to enter a name and description and specify a destination if you want to store your backup somewhere other than the default location. You can also specify a backup schedule and choose to have the N4B1 automatically sync your USB device every time it is connected. Lastly, you'll need to select a backup method (Incremental, Full, Copy or One).
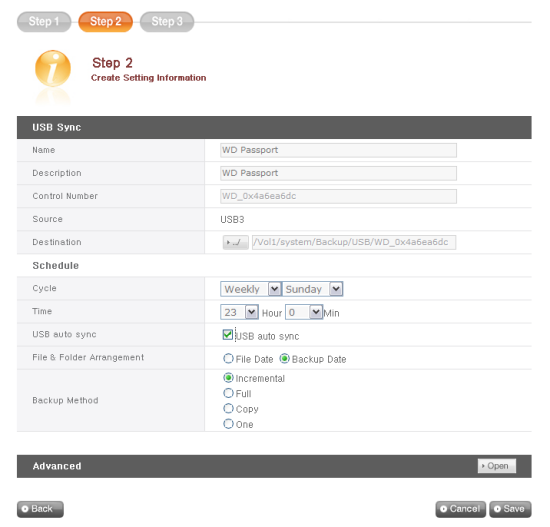

If you want to modify your task or manually sync your device using these settings, you can do so through the USB Sync option under the Mobile Devices menu.
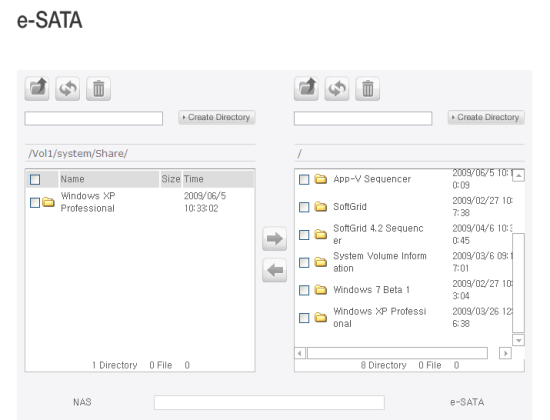
The N4B1 also includes functions to transfer data between e-SATA devices, USB devices, memory cards and the NAS.
 |
 |
The NAS folders are displayed on the left window and folder structure of storage device on the right. Selected files and folders can be transferred back and forth using the arrow buttons. Otherwise, they can be deleted using the trash can button.
The N4B1's most unique feature is its built in Blu-ray ReWriter. Using this drive, you can backup and copy content from discs, burn data and images, and perform scheduled backups of the NAS.

Looking at the screenshot above, you can see that the drive in the N4B1 is LG's 8x Blu-ray ReWriter, the BH08NS20.
If you'd like to make a quick backup of a disc, you can use the buttons on the front of the device. Simply insert the disc into the drive and then press the MODE button until the ODD backup mode appears on the LCD. Pressing the SET button will begin the backup process. The NAS will create an image file (.iso or .bin/.cue) and store it in the default folder (n4b1/Backup/IMG).

You can also make a disc image backup using the Storing option under the Mobile Devices menu. The only real benefit of using the web interface is that you can specify the path where you want to save the image.

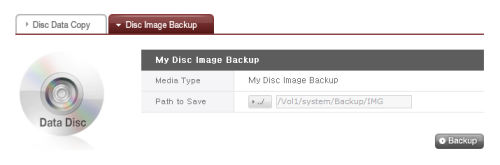
Instead of creating an image, you can copy the contents of a data disc to the NAS. Here too, you can specify where you want to save the data.


To burn a disc image, you can use either the buttons on the front or the web interface. If using the buttons, you will need to press the MODE button until the ODD burn mode appears on the LCD.

Pressing the SET button will start the ISO image file selection process. From here, you use the MODE button to scroll through the images stored in the default folder (n4b1/Backup/IMG). When you've found the one you want, press SET and the N4B1 will burn it to disc.

You can also burn a disc image using the Burning option under the Mobile Devices menu. To do so, go to the folder where your images are stored and select the one you want to burn to disc.

Burning individual files and folders to disc is possible as well using the Burn Disc option. The NAS folders are displayed on the left window and folder structure of the disc compilation on the right. Selected files and folders can be added and removed using the arrow and trash can buttons.

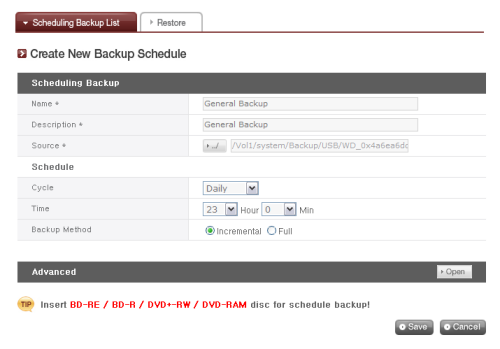
Thanks to the N4B1's Blu-ray Disc writer, performing scheduled backups is a very simple task. When creating a new backup, you will need to enter a name and description and select the folder on the NAS that you want to backup. You'll also need to specify a schedule and select a backup method (Incremental or Full).

LG has also included a function to restore backed up data. Entire folders or individual files can be restored from backup and when there are multiple versions, the latest file or all files can be selected and unselected.

Performance:
The test system used in this review was an HP dc7900. The computer came equipped with an Intel Core 2 Duo E8400 3.0GHz CPU, 2GB of DDR2 800MHz memory, Seagate Barracuda 7200.10 ST3250310AS 250GB SATA hard drive, NVIDIA Quadro FX570 256MB PCIe graphics card and Intel 82567LM-3 gigabit network card. For the operating system, I installed a fresh copy of Windows XP with Service Pack 3.
To test the performance of the LG N4B1, I ran a series of benchmarks using CrystalDiskMark 2.2, ATTO Disk Benchmark 2.34 and Iometer. The tests were first run with the provided Hitachi Deskstar 250GB 7K1000.B hard drives configured as a RAID 5 volume and then again as a RAID 0 volume. To eliminate any network bottlenecks, the N4B1 was connected directly to the computer using a CAT6 ethernet cable. Unless otherwise specified, jumbo frames have been disabled.
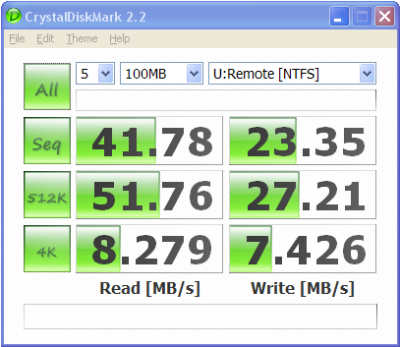
CrystalDiskMark 2.2:
First, I ran a few quick tests using CrystalDiskMark. This benchmark tool measures the performance of a storage device by testing its sequential read and write speeds as well as its random read and write speeds using blocks 4KB and 512KB in size. The test was first run using a 100MB file and then a 500MB file.
 RAID 5 - 100MB |
 RAID 0 - 100MB |
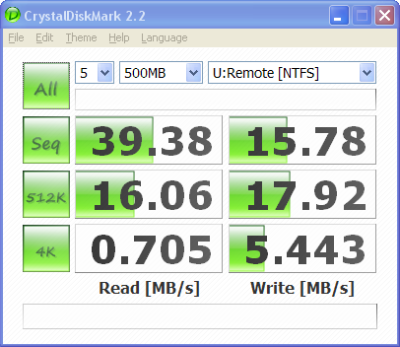 RAID 5 - 500MB |
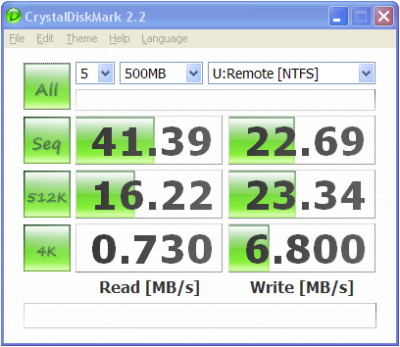 RAID 0 - 500MB |
Looking at the screenshots above, you can see that the N4B1 was slightly faster when configured for RAID 0. If you compare the results for the 100MB and 500MB files, the unit's sequential read and write speeds were also fairly close. However, its random read speeds took a serious performance hit when using the larger 500MB file.
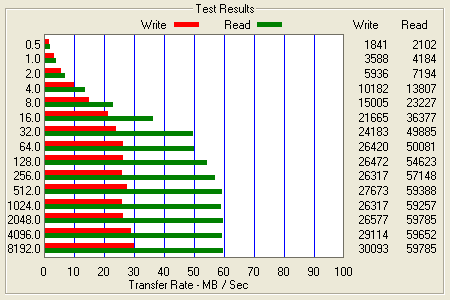
ATTO Disk Benchmark 2.02:
I also used ATTO Disk Benchmark to test the N4B1's sequential read and write speeds. The tests are run using blocks ranging in size from 0.5KB to 8192KB and the total length set to 32MB and 256MB.
 RAID 5 - 32MB |
 RAID 0 - 32MB |
 RAID 5 - 256MB |
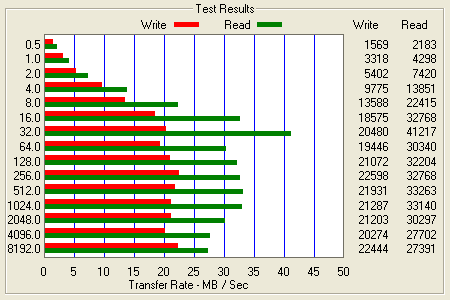 RAID 0 - 256MB |
With the total length set to 32MB, there was very little performance difference between RAID 5 and RAID 0 on the N4B1. It wasn't until I set the total length to 256MB that RAID 0 showed any real performance advantage over RAID 5. Even then, this was limited primarily to larger block sizes.
Iometer:
Lastly, I ran a series of tests using Iometer. This tool can be configured to benchmark a number of things. In this case, I used it to measure the N4B1's sequential read and write speeds using blocks ranging from 512B to 1MB in size. To make things more interesting, I ran the tests a second time with jumbo frames enabled on the NAS and the test computer.

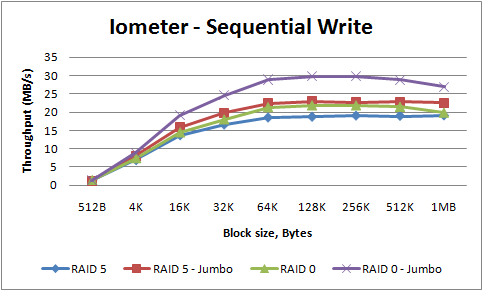
By now, it shouldn't be too surprising that the N4B1 was faster when configured for RAID 0. As you can see though, the biggest performance boost came from enabling jumbo frames. In some cases, the N4B1 was 20MB/s faster when reading and more than 7MB/s faster when writing.
The engineers at LG have obviously put a lot of effort into the N4B1. Instead of developing an NAS device that would quickly get lost in the crowd, they set theirs apart from the competition by including a built-in Blu-ray rewriter. This drive not only serves as a secondary storage medium, it makes it possible to share a BD, DVD or CD among many users by creating a virtual disc library. To store these disc images, as well as whatever other files you may have, the N4B1 features four hot-swappable drive bays and a RAID system that can be configured for data protection and speed. Data can also be downloaded from memory cards and USB storage devices and tracked using the device's version management system.
That being said, there are still a few features missing on the N4B1. First and foremost, there is no way to share an external hard drive or schedule an automatic backup to one. Given, this is what the built-in Blu-ray drive is for, but with the price of hard drives at an all time low, this would have been a cheap and easy way to expand the storage capacity of the NAS. Also, for whatever reason, LG opted not to include a UPnP/DLNA media server. While music can be streamed via its iTunes service, there isn't a really good way for digital media players or game consoles to access multimedia content. Hopefully, these are features that LG can add in a future firmware update.
For many, the N4B1's biggest sticking point will be its price. The device currently runs anywhere from $550 to $600 and that's without any hard drives. If you can do without the built in Blu-ray rewriter, a 4-bay NAS from a company like Thecus or Synology will run you a couple hundred dollars less. As usual, I'll leave the choice up to you.
Highs:
- Built-in Blu-ray rewriter
- Four hot-swap drive bays
- RAID 0, 1, 5, 1+0 and JBOD disk configurations
- Built-in backup, FTP and print servers
- Scheduled backup to BD/DVD
- One touch BD/DVD/CD backup
- One touch, scheduled and automatic USB/memory card backup
- Three USB 2.0 ports and one eSATA port
- Gigabit Ethernet NIC with jumbo frame functionality
- iTunes music server
- Built-in memory card reader
- Active Directory support
- Easy to use web interface
- Compatible with Windows, Mac OS X and Linux clients
- Good looking and well constructed design
- LCD display
- Quiet operation
Lows:
- Cannot share external hard drives
- Cannot schedule backups to external hard drives
- Does not include a UPnP/DLNA media server
- Administrator rights limited to default admin account
- Pricey